How To Install Kodi Addons and Builds: Complete Guide 2025
Kodi is powerful and completely free, but getting addons and builds to work smoothly in 2025 isn’t always straightforward. When I first started, I spent hours troubleshooting “installation failed” and “could not connect to repository” errors — digging through outdated tutorials and Reddit threads, wondering what I was missing. With over 50 million installs on Google Play alone (Play Store, 2025)1, you’re probably facing the same frustrations I once had.
Luckily, I’ve learned that most problems come down to a few fixable things — outdated repositories, broken dependencies, or unverified builds. Are Kodi addons and builds worth the time and trouble? Kodi addons and builds are beneficial if you want a flexible, no-cost media hub and you’re willing to do light maintenance. Once you know where to get trusted sources and how to set them up cleanly, Kodi becomes the all-in-one entertainment centre it’s meant to be.
You don’t need special tools or advanced skills; you just need a few quick settings adjustments and the right source links. In this guide, I’ll take you through the exact steps I use to install Kodi addons and builds on my devices — no clutter, no sketchy repos, and no endless “update failed” messages. Plus, some practical tips to boost Kodi performance and avoid common issues.
How Do You Set up Addons on Kodi?
- Enable Unknown Sources (for third-party addons).
Open Kodi, go to Settings > System > Addons, and toggle the Unknown Sources option. You can skip this step if you’re only installing official addons. - Add the file source (for third-party repositories).
Return to the Settings menu, select File Manager, double-click Add Source, select None, paste the repository link, and name it something easy to remember. - Install the addon.
Go back to the Settings menu and choose Addons. For official addons, select Install from repository > Kodi addon repository, then pick and install the addon you want.
What’s the Difference Between Kodi Addons and Builds?
Kodi addons and builds are related but serve different purposes. Addons are like plugins or apps for Kodi that add a specific feature or content source to it. For example, the Crew, Popcornflix, and Netflix addons provide movies and TV shows within Kodi, while PBS Kids and TV Ontario Kids give access to a wide range of cartoons and anime.
In short, addons are what give Kodi its real power. Without addons, Kodi is just a basic media player with no extra functionality. Most addons are designed around a specific service or type of content, like sports, music, and documentaries.
A Kodi build is a pre-configured Kodi setup that bundles a collection of addons (both streaming and utility) along with a customized layout, widgets, shortcuts, skin, and settings. It’s essentially an all-in-one package.
The best builds come with unique themes and menus — for example, Diggz Xenon has a futuristic interface, popular addons, and extensive customization options. While builds are optional, they make setup quicker and give Kodi a fresh, customized look that’s ready to use right away.
To put it simply, if you want a one-click, fully loaded Kodi, a good build can quickly set everything up — from popular addons to a stylish interface. Just keep in mind that installing a build will overwrite your existing addons and settings. You can always install addons without a build, but a build relies on its included addons to work properly.
How To Install Kodi Addons and Builds — Step-By-Step Guide
From experience, I find that installing official addons is usually easy, as opposed to third-party addons and builds, which are a bit trickier. The truth is, downloading, installing, and using Kodi addons and builds is much simpler than it seems — and once you’ve done it once, you’ll realize how quick (and even fun) it actually is.
How To Install Kodi Addons
How do you add addons to Kodi? You can install addons through Kodi’s official repository (which comes built-in) or from an external (third-party) repository. Do you really need Real Debrid for Kodi to work? No, Kodi runs normally without it. It’s optional, but Real Debrid can really enhance streaming quality in supported addons.
Install Kodi Addons Through the Official Kodi Repository
The easiest and safest way to get addons is from the official Kodi addon repository. These addons are vetted for safety and legality. You’ll find options like YouTube, Rai Play, and ARD Mediathek, as well as utility addons such as Backup, Trakt, IPTV Manager, and Log Viewer for Kodi.
Here’s how to get addons from the official repository:
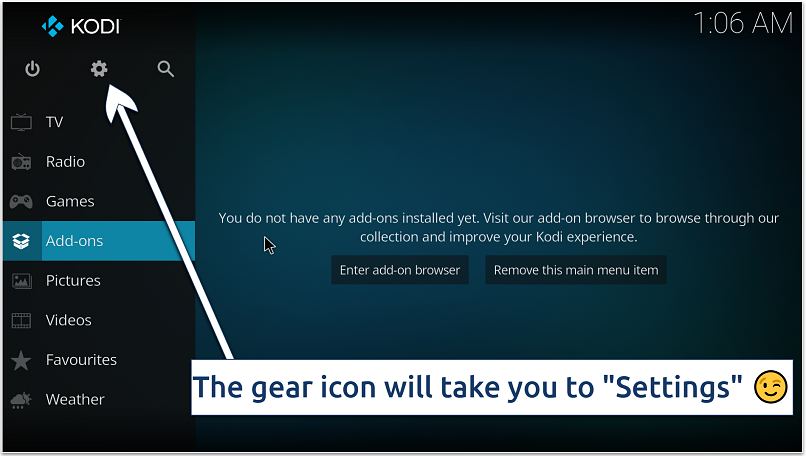
1. Open Kodi’s addons browser. From Kodi’s home screen, go to Settings, then select Add-ons from the System menu. Alternatively, from the home screen, select Add-ons, then click the box icon (Package Installer) at the top.
 This process works for Android TV and Fire TV
2. Choose Install from repository from the list. To access unofficial Kodi addons, follow the steps in the guide below.
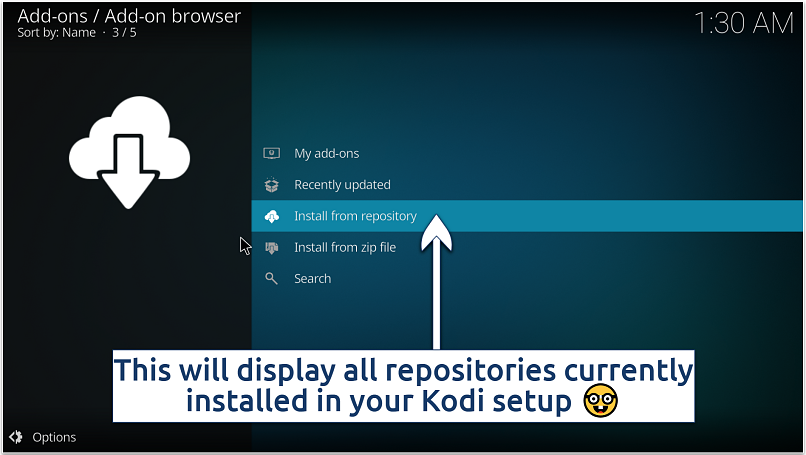 Every addon in the official repository is free from malicious code or pirated content
3. Choose the Kodi Addon repository. Usually, this option pops up right after clicking Install from repository — that’s been the case for me when testing the various versions of Kodi, including Omega (v21), Nexus (20), and Matrix (v19). But during this latest setup, it didn’t appear right away after I did a fresh install. It only showed up after I added an addon from an external repository.
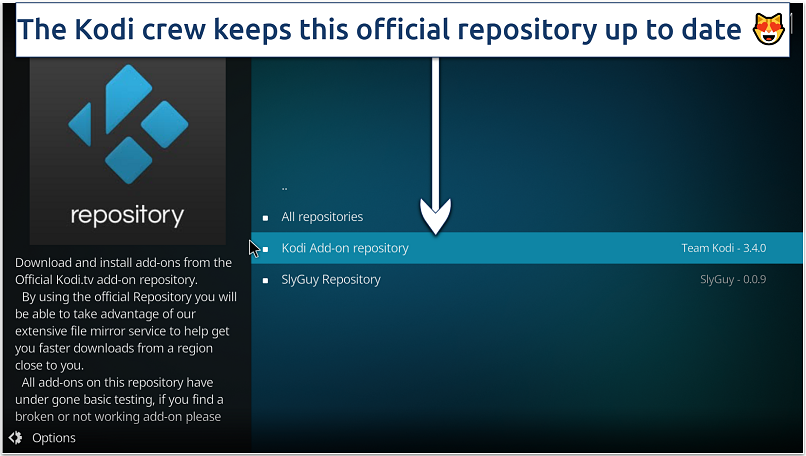 Addons in the official repository differ between Kodi versions
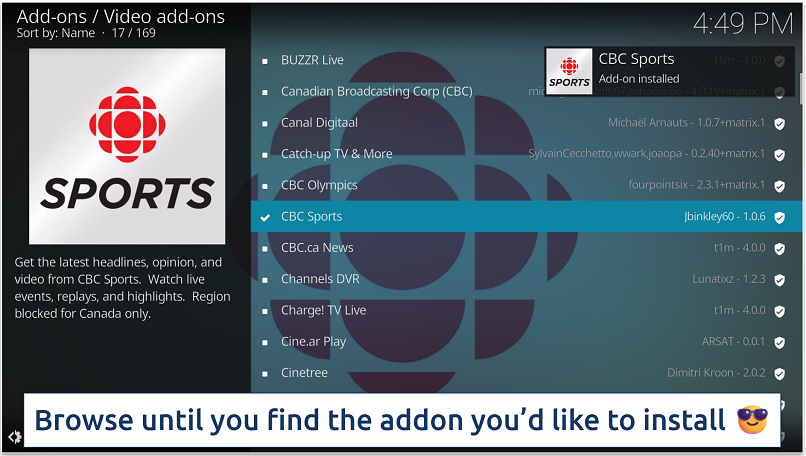
4. Browse categories. Navigate the categories (e.g., Movie addons, Music addons, Picture addons, Game addons, and Programs addons) and find the addon you want.
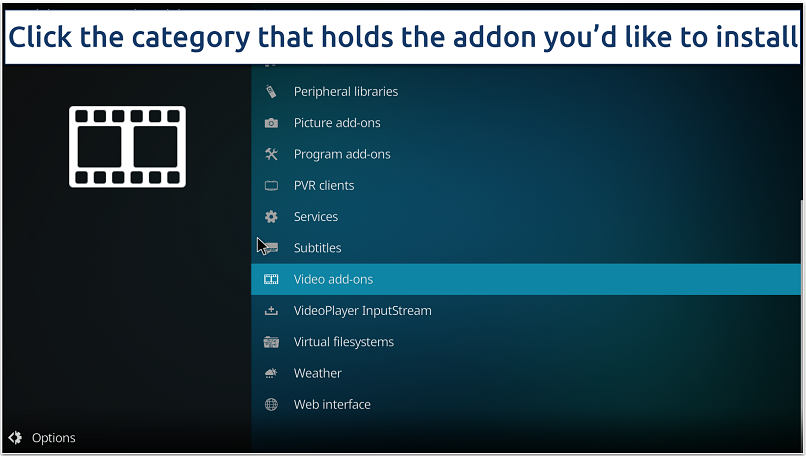 For example, for CBC Sports, go to Video add-ons and scroll to CBC Sports
5. Select the addon’s name and hit Install. Kodi will download it along with any required dependencies.
 A notification will pop up in a few seconds confirming successful installation
6. Access and launch the installed addon. While still in the same window, click the addon and choose Open to launch it right away. Alternatively, go back to the home screen, and under Addons (or specific categories like Video addons, Picture addons, and Music addons), you’ll find it listed there. Simply click the addon and start using it. That’s it!
Install Kodi Addons From an External Repository
To install addons from an external repository, you’ll need to go through a few extra steps. I’ll use the Crew addon as an example, but the same process applies to other third-party addons like Exodus, Ares Wizard, and Covenant.
You can also use these steps to add official addons that might not show up in your current Kodi setup but are available through third-party repositories. With every new Kodi release, some addons disappear or stop working. For example, NBA League Pass was included in some earlier versions, but it isn’t available in the official repository of Kodi v21.2 (Omega). This can happen when specific addons aren’t updated or supported in newer versions. I recommend using the latest version of Kodi as it is always the most secure and stable.
1. Enable Unknown Sources. Kodi blocks third-party addons by default, so you’ll need to enable Unknown Sources first.
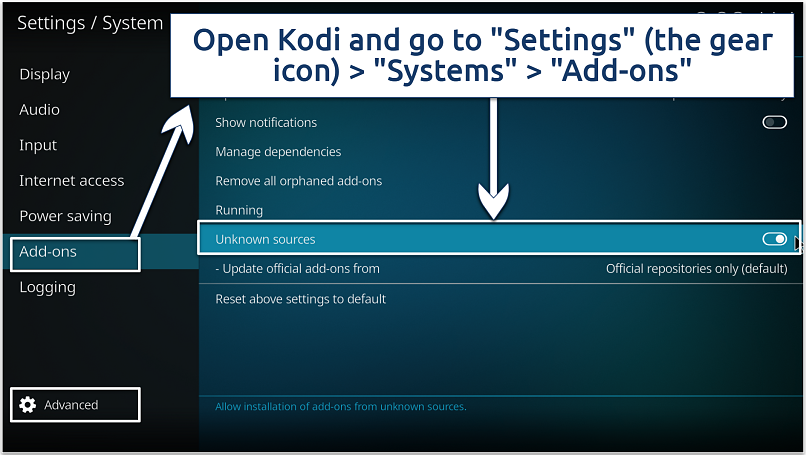 Enable Unknown Sources on the right side and confirm by clicking “Yes”
2. Add the repository source. Press the back arrow to return to the System menu, then open File manager. If you have used Kodi before and didn’t click Yes, I’m Sure when uninstalling (that’s the step that deletes your profile folder), you’ll probably find your old files still there — a nice little bonus.
Next, double-click Add source in the left panel. When the pop-up appears, select None, then type in or paste the URL of the repository you want to add — for the Crew, that’s https://team-crew.github.io/.
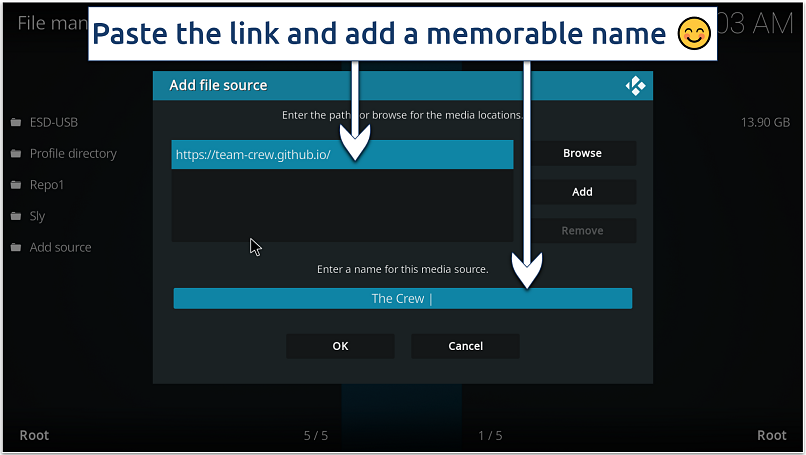 Once you click “OK”, the name you assigned will appear on the left, confirming the source was added successfully
Make sure to paste or type the URL correctly; even a single missing character or space can cause errors. Also, check that your internet is working correctly so Kodi can reach the source and install the repository without interruptions.
3. Install the repository from the zip file. Return to the System menu, choose Addons, then select Install from zip file.
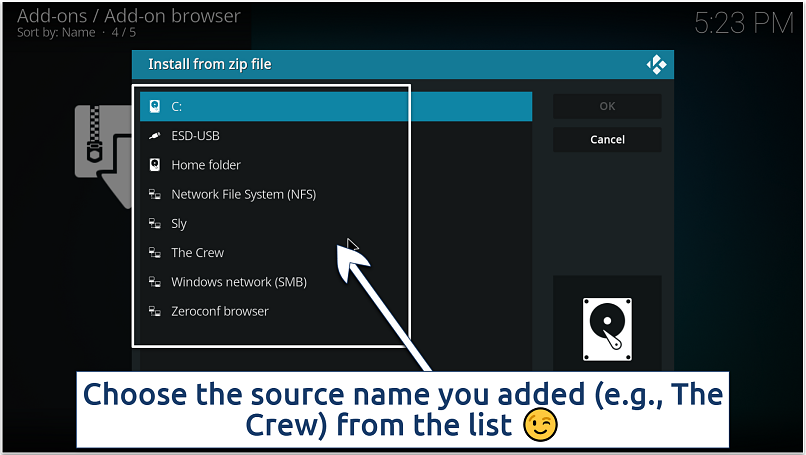 Next, click the zip file to get the installation started
Kodi will install the repository; after a moment, you’ll see a notification confirming everything went through.
4. Install the addon from the repository. While still in the addon menu, choose Install from repository, and then open The Crew Repo.


5. Enjoy the addon. Third-party addons open and work like any official addon.
How To Install Kodi Builds
Installing a Kodi build takes a bit longer than adding a single addon, but the process is quite similar. When you put a build on Kodi, you’re essentially installing a repository and then a build wizard (a program addon) that downloads and configures the whole setup for you.
Before installing a build, it’s often recommended to start with a fresh Kodi installation or at least reset Kodi to default settings. This prevents conflicts between the build and any existing addons or settings.
Can you install multiple builds in Kodi? Not really — Kodi isn’t designed to run multiple builds at the same time. Each build replaces the previous ones since it overwrites Kodi’s addons, interface, and settings. Trying to install more than one can slow performance or cause conflicts.
The first three steps are the same when installing third-party addons from external sources. I’ll walk you through a simplified version below, but if you prefer detailed steps with images, you can scroll to the section above.
Here’s how to install a Kodi build step-by-step:
1. Enable Unknown Sources in Kodi (One-Time Toggle)
From Kodi’s home screen, click on Settings (gear icon) > System > Addons, and toggle on Unknown sources.
2. Add the Build’s File Source and Name It
- Go to the System menu, choose File Manager icon, and double-click Add source. Select None, and enter the URL for the repository for the build you want to install. For example, to install Doomzday build, type in or paste https://doomzdayteam.github.io/doomzday (exactly as is).
- Next, give your source an easy-to-remember name and click OK. The name you assigned will instantly appear in the File manager list, confirming the source was added successfully.
3. Install the Repository From the Zip File
- Go back to the Settings hub, choose Addons, and select Install from zip. Choose the name you assigned to your source in step 2 and click the repository zip (for example, repository.doomzday-1.1.0.zip).
- Wait for the installation confirmation message.
4. Install the Build’s Wizard Addon
- On the same screen (Addon browser), select Install from repository, and open the repository you installed in step 3 (for example, Doomzday).
- Inside, find Program addons — most builds use a program addon “wizard”.
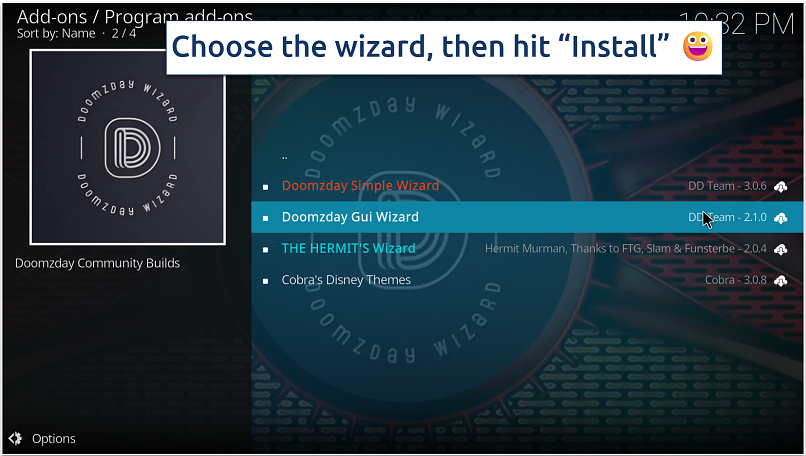 Some builds feature multiple setup wizards — pick the one that fits your build
 - Wait for the Wizard to install. This takes a few seconds, and you might get an additional prompt to install dependencies. Click OK. Some builds, like Chain Theme, might ask what to keep during setup.
5. Open the Wizard, Pick Your Build, and Install It
- After the wizard is installed, open it. Many wizards will pop up automatically with a setup screen or menu. If prompted with notes and settings, you can just continue or dismiss.
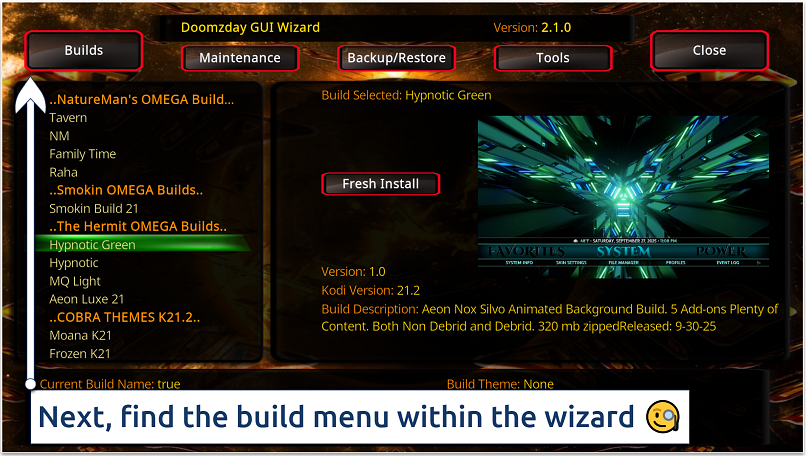 You should see a list of available builds like Smokin OMEGA Builds
 - Select your desired build from the list — just make sure it matches your Kodi version. In the image above, the one I selected works with Kodi v21.2.
- Choose Fresh Install or Standard Install. The former wipes old addons and settings (it’s the cleanest way to start from scratch), while the latter keeps some of your existing data and preferences. Some wizards offer one of the two options. I prefer a fresh install because it helps prevent leftover files or settings from causing issues later.
- After confirming the prompts, the wizard will download and install the build, then apply the skin, addons, and settings. This process can take a few minutes.
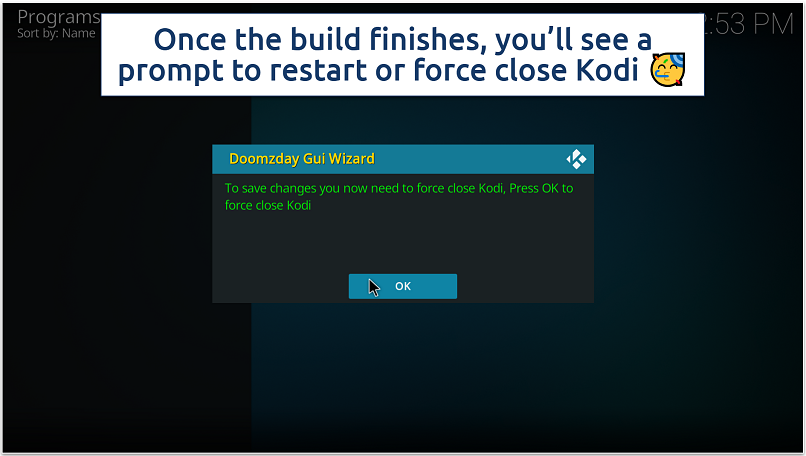 Accept the prompt, then relaunch Kodi
 - Voila — your new build is ready! Kodi will reopen with its new interface, custom background, menus, and pre-installed addons.
Are Kodi Addons and Builds Legal and Safe?
Kodi itself, and most addons and builds, are legal, but what you do with them might not be. Some third-party addons (often bundled into popular builds) include links to content that’s not licensed for public distribution. Streaming or downloading such material violates copyright laws.
For example, if an addon offers the latest movies and premium sports for free, it’s almost certainly streaming copyrighted content illegally. I recommend steering clear of those, as they can easily land you in legal hot water. The good news is that there are plenty of legal Kodi addons that let you stream great movies, live TV, and more safely.
While many addons are safe, others can expose you to malware, malicious scripts, data leaks, and data theft — especially if they come from unofficial sources. Interestingly, a peer-reviewed study published in the ACM Digital Library (2023) found that most addons people install are unofficial but generally safe to use. Still, about 78% of Kodi users have at least one unsafe addon installed2, and the worrying part is that those addons are often among the most popular.
Not all Kodi builds are trustworthy, either. Some come preloaded with outdated or unsafe addons, which can make your systems unstable or expose your data without you realizing it. Others may contain hidden scripts that track usage or automatically connect you to unsecured sources. That’s why it’s best to stick with a reputable build from reputable developers.
How To Stay Safe While Installing and Using Kodi Addons and Builds
With a bit of care, you can avoid security risks, protect personal information, and safely stream movies, sports, and more while you explore everything Kodi offers. Here’s how you can stay safe during the process:
- Download from trusted sources. When searching for addons (especially third-party ones) and builds, avoid random or unverified websites. Stick to trusted repositories to reduce the risk of downloading malicious files.
- Enable antivirus software. Before downloading any files, make sure your antivirus software is active. It can scan the zip file and block any harmful elements.
- Keep Kodi updated. Always use the latest version of Kodi for the best compatibility with addons and to protect yourself from vulnerabilities in older versions.
- Review addon permissions. Before installing an addon, check what permissions it requests. Avoid addons that request unnecessary access to your system.
- Avoid sharing your accounts. If you’re using Real Debrid, Trakt, or any integrated account, don’t share your Kodi credentials with others. Account sharing can expose your viewing habits or compromise your privacy.
- Use a separate streaming device. If possible, run Kodi on a device that you don’t use for personal accounts, banking, or messaging. This reduces the risk of cross-exposure in case of a security breach.
- Limit personal information. Most addons don’t require an account, but if you integrate third-party services like Real Debrid or Trakt, only use the bare minimum info when signing up. Ideally, use a burner email — that way, if any of these services are ever compromised, your primary email address stays safe.
- Use a reliable VPN. Do I need a VPN to install Kodi addons and builds? Using one is recommended to protect your online privacy and keep connections secure when setting up addons and builds. The best Kodi VPNs encrypt your internet traffic and hide your IP address, keeping your online activity private. This is especially important when downloading addons from unknown sources, as it helps protect you from tracking and cyber threats.
Best VPNs for Kodi Addons and Builds in 2025
- CyberGhost — Easy to configure to launch with Kodi automatically, so you’re protected right from the first click. It also has dedicated servers for streaming and torrenting that work really well with Kodi from anywhere.
- ExpressVPN — High-speed servers and advanced obfuscation let you install and use Kodi addons and builds on any network while keeping your activity private.
- Private Internet Access — Highly customizable to help you optimize Kodi’s security and performance when using addons and builds.
Kodi Addon and Builds Not Working? Here Are Quick Fixes for Common Errors
Even after you’ve set everything up, you might encounter some hiccups. Whether an addon isn’t opening, streams keep buffering, or a build won’t install, most issues have simple fixes. Here are some of the most common Kodi problems and how to fix them:
Tips for Maintaining a Fast, Stable Kodi Setup
Once you have Kodi configured with your favorite addons or a build, you’ll want to keep it running smoothly. Here are some tips to maintain Kodi’s performance and stability over time:
FAQs on Installing Kodi Addons and Builds
Conclusion
Is Kodi really as flexible and powerful as its fans claim? Once you learn to install Kodi addons and builds, you’ll see just how much this free and open-source media player can really do. Official addons give you reliability and peace of mind, while third-party ones and builds open the door to even more features and customization.
Just remember to install from trusted sources, keep Kodi and your addons updated, and avoid pirated content. With the proper setup and a little care, you can enjoy a fast, secure, and fully personalized Kodi experience.
References
React to this headline: